Why you Should Not Use Blender 1.80
After using Blender 1.80 for modeling, animating and rendering for a while, I've come to the Shocking Conclusion that I cannot actually recommend anyone to use this version. There are a number of downsides to using 1.80, but to be fair I will first talk about the good things

The Good
Blender 1.80 is the oldest version that will run on modern x64 windows systems, which makes it easy to test ideas before putting them into practical use on actual old hardware. Blender 1.80 is also very lean, the binary is a whopping 2.12 MB and launches in the fraction of a second. And yet you are able to model, animate and render scenes, as well as doing simple video editing. Okay that's enough good, let's get to the real meat of the post.
Navigation
Navigating in 1.80 is for the most part identical to modern blender, with the exception that scrolling the mouse wheel is not recognized. The first real minus that 1.80 gets is the lack of auto depth, making it more difficult to navigate a larger scene as you will need to select an object and focus on it to move the viewport rotation pivot in a predictable way.
Blender 1.80 has a toggle in the settings to switch between trackball and turntable navigation, and
trackball works like you'd expect and so does turntable ... at first glance. After rotating the view a bit
you will notice that it starts to tilt ever so slightly, and the tilt just increases the more you rotate,
especially if you rotate the view quickly. Turns out that the turntable implementation in 1.80 is
imperfect, and eventually (or if you rotate quickly on purpose) it gets so bad that you run into gimbal
lock.
Viewport & UI
The interface in 1.80 follows the same paradigm as Blender always has: the window is split into several non-overlapping
areas that can be resized, split or joined, and you can choose what type of editor goes in each area. The
frustrating part in 1.80 is the splitting and joining process. You start a split by MMB clicking on the
border between areas, but which of the areas will actually be split depends on which side of the border
you clicked closest to. You have about a 3px threshold for this, so often you end up having to cancel a
split and redo it while aiming better. The same goes for joining areas, the area your cursor is closest to
will "win" and become the larger area after the join. EDIT: turns out it's always the active editor/area that will be split or joined, so if you approach the border from the editor you want to split then you'll always get it right.
Later versions improved this functionality, first by having splitting and joining both appear in the menu whether you right or middle clicked (2.0), and then allowing the split line to move between the adjacent areas (2.37) and finally giving you an arrow indicating which areas would be joined (2.40).

The viewport is where most of your work is done, and Blender 1.80 gives you five drawing modes: BoundBox, Wireframe, OpenGL Solid, Shaded Solid and Textured.
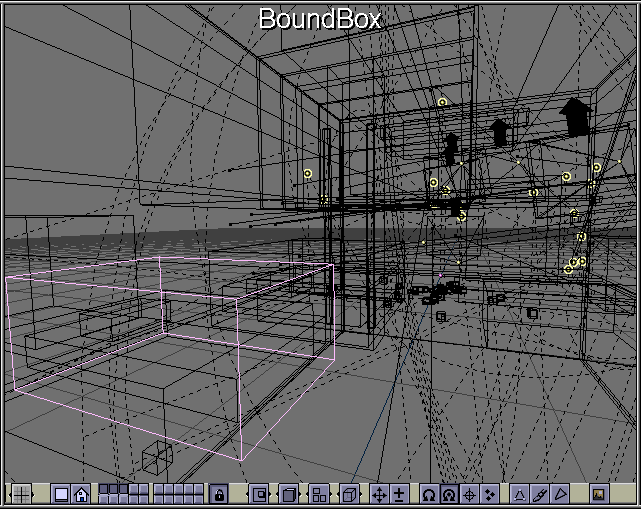
BoundBox and Wireframe are the most usable modes, as they clearly show selected objects highlighted in a distinct color. The only way to determine what objects are selected in the other shading modes is to look at the origin dots.
OpenGL solid mode works as expected, you can see filled polygons and if your materials are using a color (as opposed to a texture) then you will be able to see it. The shaded mode calculates light and color per vertex and gives you a rough approximation of the lighting of the scene. Very rough, as you can't tell the difference between flat or smooth shaded meshes in this mode. Textured shading shows image textures and how they are mapped onto the meshes, with no shading applied.
A big difference with the UI compared to the post-2.5 era is the interactivity of the interface. In today's blender you get realtime feedback in the viewport when you slide a numerical slider. In 1.80, the viewport only draws the result when you release the slider. This is understandable, as redrawing every frame while trying to find a good value would slow things down too much on old systems. What's less understandable is the insane sensitivity the numerical sliders have. The current frame number for instance, if you drag your cursor 1px on it you jump like 37 frames. This makes it inconvenient to slide this around, and you end up having to click a lot of times to advance through frames.

Object manipulation
Sometimes we want to move objects around (citation needed) and 1.80 of course lets you do the standard move rotate and scale with the hotkeys. You also have the 3D cursor available that lets you quickly snap an object to the cursor's position. Placing an object on a surface this way should be easy, but There Is One Problem: the 3D cursor does not get projected onto the surface you click on.

At other times, we want to transform objects along their local orientation, or even in their local transform space in case they are a child. The first thing is impossible. If you have a rotated object with no parent, there is no way to constrain its movement along e.g. its local X axis. If you want local transformations you are going to need some parenting.
Of course, you still won't be able to constrain movements to local axes, only the global axes work as constraints during transformations. But you will be able to modify local transform from the object transform panel that appears when you press the N key. The big downside is that sliding the value or typing a new one is not interactive, so you have to do a lot of number typing or clicking to arrive at the intended result.

Undo
When working with creative software you appreciate two things: the ability to not lose what you have been working on, and the ability to undo something you did if it turns out you don't like it. Blender 1.80 is reasonably good at preventing you from losing work, with the same autosave system that we know and love in current Blender. You choose a directory for autosaving, and the interval in minutes, and Blender 1.80 autosaves into that directory, naming the files with the process ID, so you can have multiple instances of blender running the same file, and not have the autosaves conflict.
When it comes to the ability of undoing, your choices are more limited. By default blender will keep the previous version of the file around when saving (renaming it from .blend to .blend1), and you can configure blender to automatically keep up to 32 previous versions if you wanted. This lets you do a form of large scale undo, if you made a lot of changes and accidentally saved over the original file, the previous one is still intact. That's good! (and also exactly what we have in current blender)
What's less good is the state of undo within a blender session. Say you scale or move an object, and you regret your life choices. You cannot undo anything in Blender 1.80. There is no undo system. The only thing resembling an undo is the "Reload Original Data" operation in edit modes, which resets the mesh/curve/lattice to the state it was in when you entered edit mode. With careful use, you can tab out and into edit mode to give yourself a checkpoint that you can revert back to quickly.
Data management
Once you start racking up a fair number of objects in your scene, managing them can become a challenge. Modern blender has an outliner that neatly lists all objects (and most of their related data like meshes and materials) in the scene, but here we only have the OOPS schematic. It gives you a visual overview of datablocks in the file and all their relationships as a node graph.

The OOPS schematic is actually a really useful way to learn the data system blender uses. Datablocks and their links are shown as literal blocks and links in a graph, and you can clearly see what happens when you link various data in the viewport. As cool an idea that the OOPS schematic is, the execution is sadly limited by several factors:
- You can't really do much. You can select objects and rearrange the nodes, but you can't delete, add or change the links between nodes from the graph itself.
- The nodes are laid out in a grid formation by default, with no care about grouping related nodes. This means that looking for a specific node requires you to hunt in two dimensions, compared to scrolling a list of names in an outliner (which is usually sorted alphabetically)
- Even if you meticulously arrange the node graph to your liking, that arrangement is only stored in that UI area. So if you want to have an OOPS schematic open in another screen layout, you'll have to arrange it all over again

Data management is not all doom and gloom however; if you read the manual it turns out there is another way to view and select the datablocks of the current file. You know how in modern blender when you link or append from a blend file, you get a file browser that lets you browse through the different datablock categories as if they were folders and files? Yeah, 1.80 does this as well when linking or appending, but you can also invoke the file browser in a similar "Data Select" mode for the current file by pressing Shift+F4.
Data Select lets you select datablocks from a textual list, which can even be sorted alphabetically! Selecting object datablocks will also select them in the viewport: multiple objects can be selected by holding RMB and sliding your cursor over the names. The only other operation you can do other than selecting is to assign a fake user to datablocks by pressing F. The numbers on the right are the number of users of each datablock. It ain't much but it at least has some of the uses that the modern outliner has.

Mesh editing
Mesh editing may be 1.80s weakest point, at least when compared to editing of other object types. Limited tools make it difficult to do the operations you want to do, and the viewport makes it hard to choose what you are working on, let alone seeing whats going on.
By default, going into edit mode on a mesh will only change the drawing mode slightly from the Wireframe one; vertices are drawn as 2x2px dots and you can see the full wireframe of the mesh (in object mode coplanar edges are hidden by default to speed up drawing). There's no indication of where a face exists by default like the face dots we got used to in later versions. Thankfully, the "Draw Faces" button enables face drawing in edit mode, but faces are drawn as inset quads or triangles instead of filled polygons that we might want instead. It's an odd choice but at least we can tell which faces are selected now.
If the wireframe draw mode is so bad for editing meshes, surely the solid one will be better? No, it is Actually Worse; the only difference between object and edit mode in solid draw mode is that you can now see vertex dots. And the vertex dots are not occluded by geometry (and neither is selection). Oh and normals only update after committing transformation, as if seeing the shape of something wasn't hard enough.

Okay, so it is Hard to See what we are working on, but let's power through it and try modeling a bit. Let's start with a cube and then make a loop cut. Spoiler: You Cannot. In fact there is no concept of loops at all. You can only select vertices. Which means a lot of repeat selecting if you want to do things like "Delete every other face"
One saving grace in edit mode is the ability to hide/reveal geometry with the familiar H and Alt+H hotkeys. The big downside is that the hidden state is not persistent, so if you've meticulously hidden a specific set of vertices and you toggle out and into edit mode to give yourself a checkpoint you can reset to (since there is No Undo), you'll now have to hide the specific geometry all over again. Bummer.
Another quirk of having no undo system is that a lot of operations will prompt you for confirmation before doing the thing. Take extruding for example, when you hit E a little button appears under your cursor asking if it's OK to Extrude. This can be annoying at first but after a while of working with it your muscle memory takes over and it's not too big of a deal.

The last point I'll bring up about mesh modeling is the face normals Situation (it is crazy). Even in modern blender you often end up with unintentionally flipped normals, but this old version takes the cake; the orientation of a newly added face is almost random. Even with a best case scenario of a cube or grid with one missing face, 1.80 will ignore the orientation of neighbors when inserting new faces with the F key. And trying multiple times to insert the same face and deleting it can lead to different orientations

No wait I have one more complaint about edit mode: you cannot type in a numerical value while transforming. Say you want to extrude a vertex and move it exactly 1.25 meters (or generic blender units as they are here) along the X axis. Pressing X does nothing, but you can use MMB to auto constrain to the axis you moved most towards (like in modern blender, although the way it determines axis is a lot less intuitive). Moving it exactly 1.25 units is Not Easily possible however. You can hold Ctrl and then it will snap to grid increments, and holding shift snaps to 10ths of the grid increment. So you can get to 1.20 and 1.30 but not 1.25.
The only way to get to 1.25 precisely is to either edit the active vertex coordinate directly by pressing N (but this does not work for multiple vertices, it only affects the single active vertex), OR you set the grid spacing of the viewport to 0.05. The good thing is that grid spacing is per-viewport, so you can set up your workspace with orthographic viewports for specific unit increments if you so desire. The power of the flexible UI comes in to save the day I guess.
Actually, there's one more thing about meshes. Subdivision surfaces. In 1.80 they are called S-meshes, so you'd expect them to be S-tier (They Are Not). If you turn on subdivision (the S-Mesh button) for a cube it will smooth out to somewhat of a sphere, though it's a bit smaller than usual. It's when you start extruding a face from that cube that your expectations are shattered.

Yeah, this Is Not Catmull-Clark subdivision. This ... This is Subdivision We Have At Home.
The subdivision algorithm used here is incredibly funny, it lets you make blobby snakes simply by varying the spacing of edge loops. The subdivided surface geometry can overshoot the cage in convex areas. Overall this subdivision implementation seems mostly suited for making eldritch horrors.

UV Maps
Oh boy, UV maps! UV editing was actually the main reason I had to upgrade from Blender 1.60 when working on the 90s PC. Without UV editing it would be very difficult to model a nice and detailed urban environment. You really want the ability to map image textures onto polygons arbitrarily, without being limited to the "Generated" texture coordinates (referred to as "Orco").
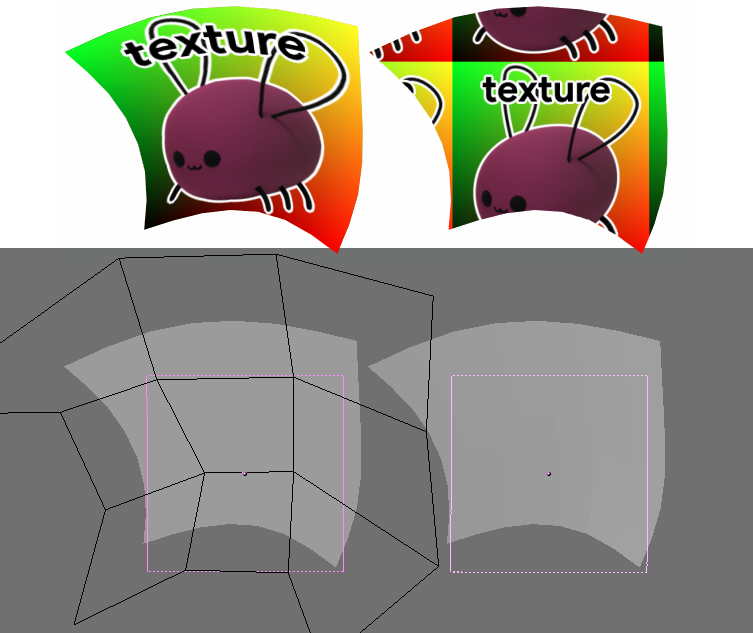
The generated texture coordinates will follow deformations by lattices and shape keys, but once you apply the deformation to the mesh, it's back to square one. Enabling the TextureSpace visualization per object shows the generated texture space as a dashed box. You can move and scale the texture space, but not rotate it (just like in modern blender!). It's handy for modifying tiling textures in a more interactive way, or for placing a single texture on an object that is otherwise procedurally textured, but you cannot use it to e.g. texture a curved road directly (unless you resort to lattices).
So, we're going to want the ability to edit UVs if we're going to texture a scene properly. 1.80 lets you do this from the "FaceSelect" mode mentioned earlier.While in FaceSelect mode, you can assign images directly to faces and edit UVs much like in modern blender. The interesting part is that image assignment is completely separate from materials. You can assign a separate image for each polygon if you want, even though you have one or no materials on your mesh yet.

Of course, doing a render will reveal that the images aren't actually associated with the material (yet). To get an image actually showing up in a render, you have two options: link it to a texture datablock that you then use in a material, or toggle the TexFace button in a material.
Linking an image to a texture datablock is the closest equivalent to the modern blender workflow, just that now we use a node in the shader editor instead of having to use the antiquated texture datablock concept. Each material in 1.80 can use up to 8 texture datablocks, so if we wanted to do a PBR-ish workflow we could use a base color texture, roughness and normal (although 1.80 doesn't have equivalents for roughness and lacks proper normal map support but you can get part of the way there)
The problem with this workflow is that only the first material seems to have access to the UV coordinates. If you try to use multiple materials on a mesh with UVs you will run into funky issues and often times even having 1.80 outright crash on rendering.

The TexFace button makes a material use the assigned images directly as the base color, allowing you to easily texture a mesh with many separate images. The downside is that face textures can only ever be base color. You are not able to supply e.g. specular or bump face textures. You can still use image or procedural textures to mix up the result a bit though.
These limitations are ultimately not too severe, as the base color was probably the most important part of a material in this non PBR era of 3D graphics

Okay, so we can use UVs in 1.80 if we watch out for the issues above. But Wait, There's More! Once a mesh has a UV data layer, it becomes illegal to perform join operations with the mesh.

Oh and before we move on, there is one really annoying bug when editing UVs: scaling the UV islands offsets them by several times UV unit distance to the left. On the 90s PC it offsets them about 2 units to the left. On my main PC it offsets it by ... well ... I could not find the islands anymore and opened a 1.80 file in modern blender to check the coordinates directly. Lol, Lmao even:

Curves & Text
Curves are actually rather feature complete in 1.80. There's the three familiar curve types: Poly, Bézier and NURBS. The interface does have buttons for B-Splines and Cardinal splines but clicking them pops up a "ERROR: Not implemented yet". There's the same bézier curve handles available as today, with specific hotkeys for them instead of a single menu on V: Auto (Shift + H), Vector (V), Aligned/Free toggle (H). You can fill segments between endpoints of separate splines with F, but curiously you cannot use F to close the gap between the start and endpoint of a single spline to make it cyclic, you have to press C to make a spline cyclic.
There's 2D and 3D curve modes, extrusion and beveling just like modern blender. The main missing thing is curve radius. There is tilt but no radius. Text objects mostly work, even text along curves is a thing. Custom fonts are supported, but only fonts in the .pfb format are accepted. I tried converting comic sans into one but the spacing completely broke.

One annoyance with curves is that the default bevel only produces a half circle. This makes sense for 2D curve objects as it makes up the edge of the filled part, but even with curves set to 3D you don't get a circular bevel. You have to make a circular curve object and specify that as the bevel object.
Animation
Blender has always been animation software, so there's no surprise that we can also animate in 1.80. The animation system is called the IPO system, for "InterPOlation", with the equivalent of today's Graph Editor being the IPO editor. The editor is quite similar to the one we're familiar with, the biggest difference being that all animatable channels are always listed.
Animation data is stored in IPO datablocks, and each block is specific to one type of animation; Object, Material, Mesh, Sequence and Lamp being some examples. You can use a single IPO block to animate more than one datablock, e.g. using the same ObIpo to animate two objects, or using the same MatIpo to animate the material on many objects.

Inserting keys is mostly the same as modern Blender: hit I and choose what property you want to insert keys for. The IPO editor can be set to display keyframes, letting you move around data for multiple channels at once. One really cool animation feature here is the ability to draw objects at their keyframes in this mode. Not only that, but you are also able to select the keyframes and move them in the viewport!! With the DupliFrames feature you can also get the object drawn at all the interpolated frames, making this very close to interactive motion paths.

Okay, onto the bad stuff. The first is that there's no auto clamped handle type, which means that you end up with overshooting curves very often when you want an object to stay still, and the only fix is to go tweak the curves.

Animating a single object is easy enough, but multi-object animation is very painful in 1.80, as the IPO window can only show the animation of the active object. If you need to adjust the timing on multiple objects, you're in for a lot of tedious repetitive work! With the keyframe drawing in the viewport, you are at least able to move the entire animation of multiple objects at once spatially, but this doesn't help with timing.
Furthermore, while inserting keyframes in the viewport inserts on all selected objects, removing keyframes or from multiple objects at once is not easily possible. There isn't even a way to unlink IPO blocks from multiple objects at once! EDIT: turns out there is a way: if you "link Object Ipo" from an object with no Ipo linked, all selected objects will then have no Ipo linked, which does make sense.
When animating you need to view the result in motion, so you either have to play a part of the animation or scrub the timeline. One Problem: there isn't really a timeline. Scrubbing in the IPO window is not possible in 1.80, and the closest equivalent to a timeline; the sequencer window, doesn't update the viewport while scrubbing. Alt + Scroll doesn't scrub either, so the only way to "scrub" without playing is to hold down the left or right arrow key.
When animating rotations, the IPO system only gives us euler rotations. This is bad if you want to do character animation! I've observed this first hand when animating Puno (whose skeleton is a collection of empties). Of course, you shouldn't do character animations without the armature object type that was added sometime in the 2.0x versions. Quaternion rotations would continue to be exclusive to bones in armatures until the 2.5 animation overhaul.
Materials and Rendering
Blender at this point was a pure scanline renderer. Which means it's fast! Even on the late 90s PC you could feasibly render high resolution stills and animations if you let it sit for a while. The downside is a lack of features for realistic lighting and materials.
Blender 1.80 lets you place lamps in your scene, but anything not in range or in direct view of the lamp will be pitch black, as there is no global illumination. There are multiple ways around this, one is to place Hemi lights to simulate light coming from an overcast sky or light being reflected from the ground. The other more lazy way is to give the world some ambient light. The ambient light solution isn't very good as it just adds a constant color to everything, washing it out.
Another thing about lamps is that we usually want them to cast shadows, as without them it is a lot harder to tell where an object is positioned in a scene - e.g. is it floating in the air or sitting on the ground? In 1.80 the only lamp type that can give shadows is the spotlight, and it does this in the shadow map method, requiring you to adjust shadow buffer resolution, near and far clip distances and shadow bias for best results. These shadows can be made quite smooth if you crank up the samples and softness values.

Using hemi lights has an annoying quirk however; they cause specular highlights, even though that doesn't make much sense - they are supposed to simulate a hemisphere of light, which shouldn't cause such harsh specular highlights. This ruins a lot of plans to use hemi lamps for faking bounce light from the floor.

Blender 1.80 does have one built-in global illumination solution: Radiosity! The radiosity solver in 1.80 runs as a type of baking operation that stores the result in vertex colors. You have to select meshes that should be part of the solve, and then configure parameters before letting it run. There are a lot of parameters to play with, and if the result of a solve has a lot of noise, you can use filters that blur the results.
If you are happy with the solve, you can make the result into real meshes and optionally replace the input meshes. You probably want to keep the input meshes around, as the radiosity meshes are dynamically tesselated during the solve. This means that radiosity is a destructive operation, and cannot be used to e.g. have animated global illumination.

To close up this section here are some examples from actual scenes made in 1.80 on period correct hardware. 1.80 has no anisotropic filtering for textures, so if you use mipmaps when rendering (which is the default) you will get the classic blurring/low res appearance of textures at grazing angles.

Another thing I had to workaround was particle alpha on the sky background. Many overlapping particles would quickly blow out the alpha and look absolutely disgusting in front of the world sky texture, so in the shots below I modeled an actual skybox and painstakingly aligned the UVs so they worked with environment map textures. The seam of the skybox is visible on the right image below.

Video Editing
Finally, we are at the video editing section. Did you know blender has a video editor called the sequencer? Did you know it always had one? Here, have a video that was edited together using 1.80's video editor (even though not all of the clips were made with that version)
Yeah! 1.80 has a video editor that lets you assemble images and videos and render them out in 4K 120fps if you want to, even if your hardware is ancient (I tested it and it works, if you are patient!). This means it blows Windows Movie Maker completely out of the water. Or well, it would if it wasn't for one glaring omission: There Is No Sound. Later versions of Blender would give you the ability to also place sound strips in the sequencer and let you mixdown to an audio file and a video file - but you would not be able to get a video file with the audio included until much later.
But apart from the sound thing, you have a fairly competent set of basic ways to assemble videos. The sequencer interface is like most NLEs in that it has multiple tracks, which is another win over movie maker. The top of the interface shows a preview of the current frame, and the IPO editor in the top left is for animating the factors of effects, e.g. to make clips fade in and out.
One quirk you will stumble upon is the ordering of strips. You'd expect strips on higher numbered tracks to be composited on top of strips on lower tracks, but in here the order is opposite. Strips on lower tracks override the ones above. But the behavior is opposite again for effect strips like Alpha Over. When an effect strip is present in a frame range, it will take priority over any of the strips with input data like images or videos, and effect strips on higher numbered tracks will take priority over lower ones.

When you need to treat a group of strips as ... a group, you can make a meta strip out of them, which will neatly pack them into a single strip on the "global" timeline. You can name meta strips to keep track of what they represent, and you can also put meta strips inside meta strips, giving you a lot of flexibility! Another win compared to movie maker.
One feature I was really missing when working on videos in 1.80 is the ability to scale and reposition strips. Any image or video you throw into the sequencer will be stretched to the render resolution, not caring about aspect ratio. In my first attempts I also believed no interpolation was being done to the footage, making the output extremely ugly when including 1024x768 screenshots on to a 320x240 video. But thankfully antialiasing is also done in the sequencer when enabled for renders with the OSA (Oversampling) button.
The bad, summarized
- Turntable navigation is flawed
- There is no auto depth, making it annoying to rotate the view
Splitting and joining areas require sniper accuracy- Solid shading obscures selection, reducing its usefulness when editing
- Shaded solid does not show smooth shading
- Numerical sliders are too sensitive
- 3D Cursor does not get placed on the surface of geometry
- There is no local transform orientation
- Numerical sliders are not interactive, showing the result only after releasing
- There IS NO UNDO
- There is no Outliner
- The OOPS schematic can only visualize and select, not edit
- Face drawing in edit mode is limited
- Normals only update after finishing a transform operation
- There is no concept of edge or face loops
- You can only select vertices
- Selection state is not preserved
- Hidden state of geometry is not preserved
- Normal calculation is not very clever, requiring you to inevitably recalculate normals
- Numerical values cannot be typed for transform operations
- Subdivision surface algorithm is extremely funny
- Only the first material ID has access to UVs
- It is illegal to join meshes if one has a UV map (TexFace)
- Scaling in the UV editor offsets islands to the left
- Curves don't have a radius attribute
- Default curve bevel is only a half circle
- There is no auto clamped handle for animation
- The graph editor (IPO window) can only show animation of active object
- There is no action editor or dope sheet
- Cannot scrub in the IPO window, scrubbing the sequencer doesn't redraw
Cannot remove animation from many objects easily- No quaternion rotations for animations
- No armatures
- No raytracing
- Only spotlights can cast shadows
- Hemi lights create specular highlights
- Radiosity is a destructive operation, and cannot be run each frame as part of animation
- Mipmapped textures are overly blurry at grazing angles
- Halo particles alpha composit badly with the sky
- Video editor has no sound support
- Unintuitive ordering rules for strips
- No way to control size and position of video strips
So what version should you use?
Let's see. Version 2.35 (November 2004) fixes a LOT of issues alone, bringing in such bangers as:
- Outliner
- Full fledged undo system
- Face and edge selection modes
- Loop selection!
- Zbuffer clipped selection
- F-Gons, the N-Gons we have at home
- plus more
However, the kinda-even-worse-than-1.80 turntable navigation is still present in this version, so if you value your muscle memory from the future, aiming for 2.37 (June 2005) is probably a safer bet. And hey, you'd still be working with an over 20 years old version!